

Photo by Rubaitul Azad on Unsplash
Unleashing Magento 2 on AWS: A Comprehensive Guide to Setting up an Ubuntu 18.04 Server with Advanced Caching
Streamline Your E-commerce Journey with AWS: Unlocking the Full Potential of Magento 2 on Ubuntu Server with High-Performance Caching


This article explores one of the most powerful e-commerce platforms in the world that has revolutionized the online business world. We'll explore the process of setting up and optimizing your Magento 2 online store on Ubuntu Server while harnessing the benefits of a caching server. I'll guide you step-by-step, from the initial setup to configuring and fine-tuning the caching server for optimal performance.
For this article, we'll be setting up the Ubuntu Server and caching server on bare metal EC2 instances. you'll experience lightning-fast page load times, improved user experience, and enhanced scalability. Together, we'll uncover the secrets to achieving blazing-fast page load times, ensuring an exceptional user experience for your customers. With the winning combination of Magento 2, Ubuntu Server, caching, and the flexibility of AWS EC2, we'll help you create a high-performing and scalable e-commerce platform that's tailored to your unique business needs.
Prerequisites
An AWS account with appropriate permissions to create and manage EC2 instances.
Terraform
Familiarity with AWS services, particularly EC2.
Basic understanding of Magento 2 and its system requirements.
An Ubuntu Server Amazon Machine Image (AMI) compatible with Magento 2.
A suitable EC2 instance type based on your anticipated traffic and resource requirements.
Configuration of security groups to allow necessary inbound and outbound traffic for your Magento 2 instance.
Familiarity with setting up and configuring ElastiCache (Redis or Memcached) for caching(we'll be using varnish cache)
A domain or subdomain for your Magento 2 store (optional but recommended).
SSL/TLS certificate for secure HTTPS communication (recommended for production environments).
Proper planning for storage requirements, including EBS volumes for data and media storage.
Basic knowledge of command-line interface (CLI) tools for server administration and SSH access to your EC2 instance.
Architecture
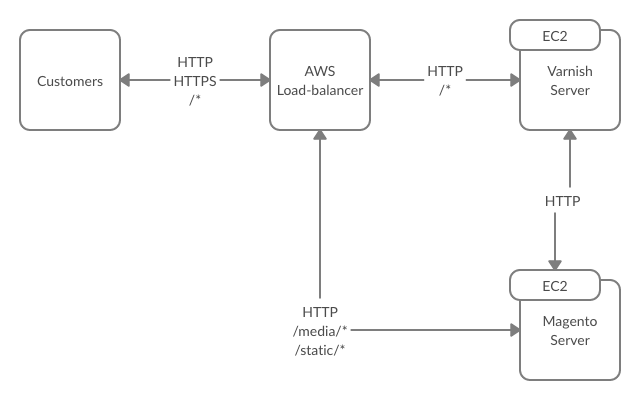
Setup:
Setup two EC2 instances for Magento 2 and Varnish Cache installations
Setup Application Load Balancer(ALB) with port 80(http) and 443(https) listeners and path rules
Connect to the instances via SSH and install Magento and Varnish respectively
Setting up infrastructure(EC2 instance, ALB)
The instances were set up with Terraform, In this tutorial, we automate the setup of AWS EC2 instances for Magento 2 and Varnish Cache and ALB using Terraform, you can save time and effort while ensuring consistency in your deployments. To help you get started, I have provided a Gitlab repository with the necessary Terraform configuration files and instructions. To automate deployment, I created setup.sh and teardown.sh scripts, which run scripts that set up and tear down the infrastructure, respectively.
Setting up Magento 2
After sshing into the instance you have selected for the installation of Magento 2, you need to install and configure Web Server(we are going with nginx) on the Ubuntu OS server.
What we need:
1. Install MySQL 2. Install php + php-fpm 3. Install Composer Package Manager 4. Install Nginx 5. Install Magento 2 using Composer
step 1 - Install MySQL database
For this tutorial, we are going to install an open-source Percona Server 5.7
$ sudo apt -y install gnupg2
$ wget https://repo.percona.com/apt/percona-release_latest.$(lsb_release -sc)_all.deb
$ sudo dpkg -i percona-release_latest.$(lsb_release -sc)_all.deb
After you need to update the local cache and check if Percona Server 5.7 is available to install:
$ sudo apt-get update
$ sudo apt-cache search percona-server
The percona-server-server-5.7 is available to install, let’s install it to our server:
$ sudo apt -y install percona-server-server-5.7
You’ll be prompted to set up a root password. Generate a strong password and type/paste it here:

Once the installation has been completed, let’s go check our MySQL server to see if it works.
$ systemctl status mysql
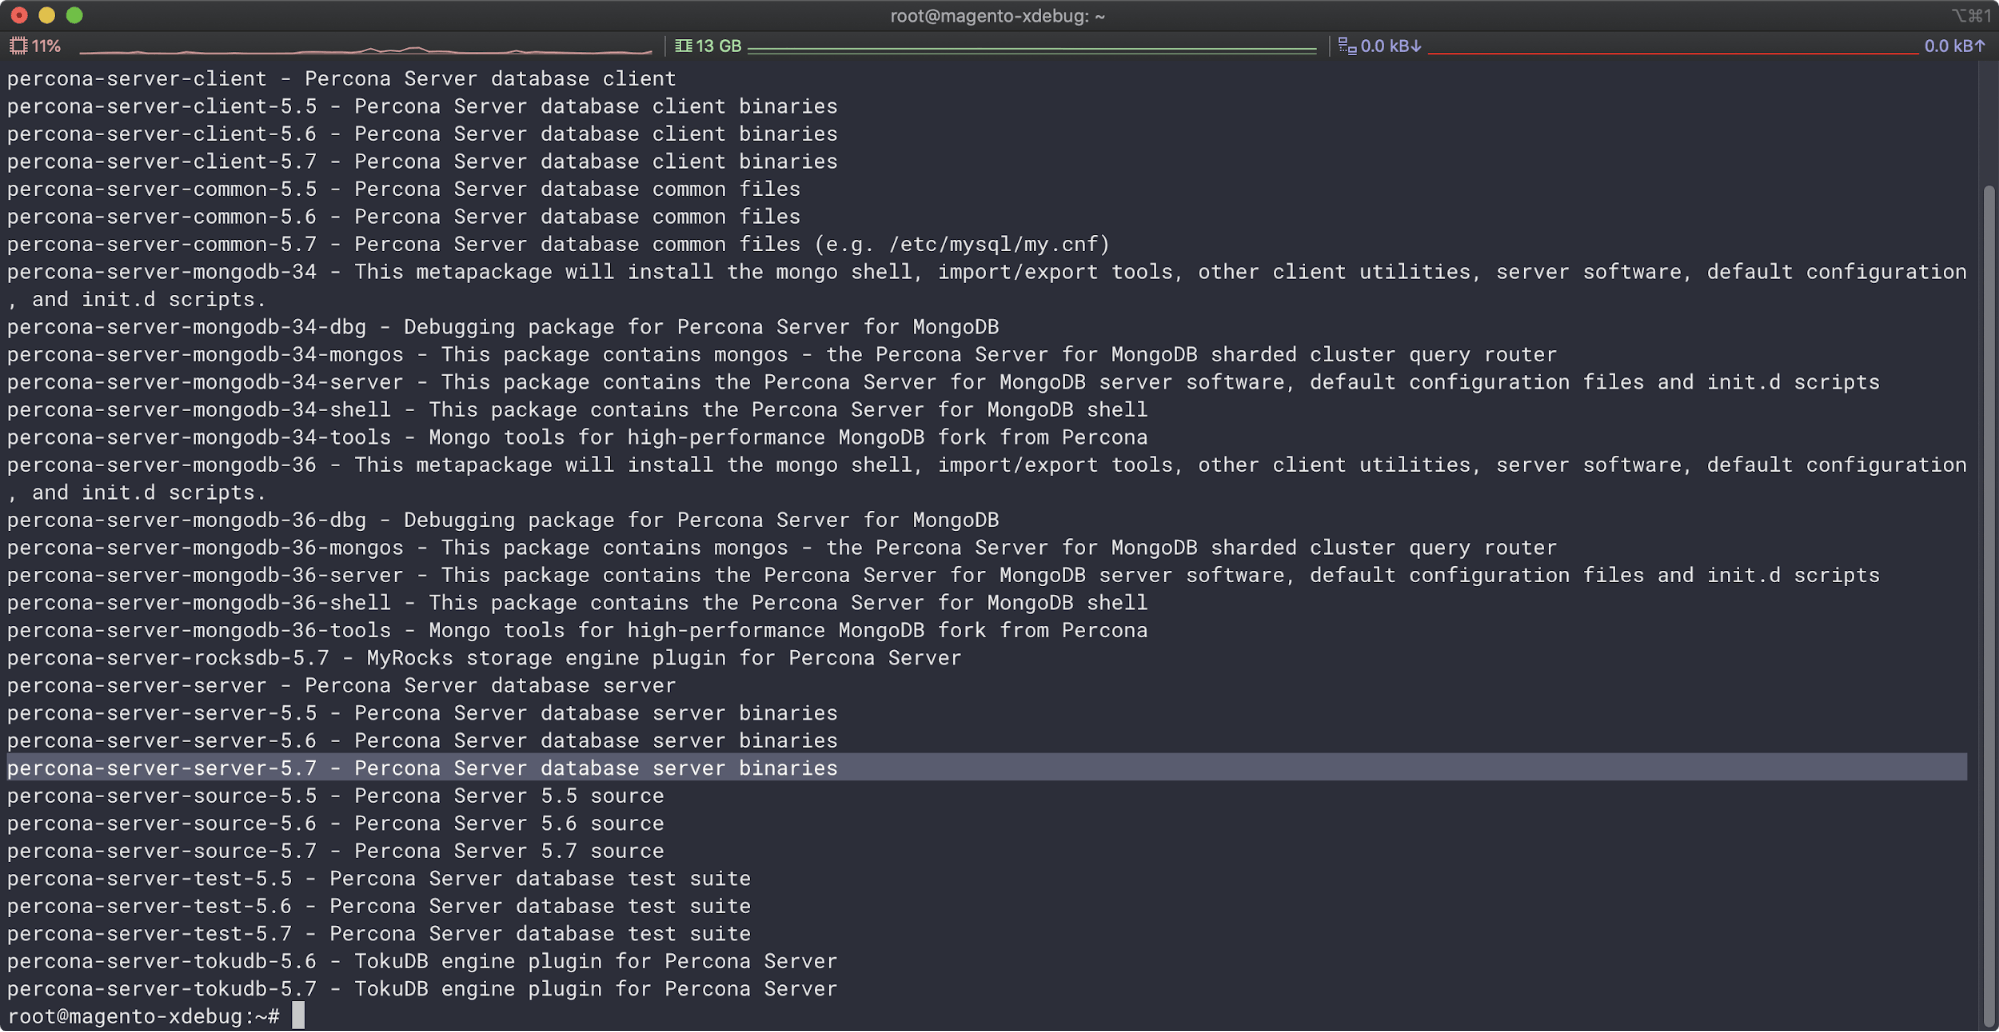
Change the MySQL server configuration
To avoid server performance issues, try to add the following configuration in /etc/mysql/percona-server.conf.d/mysqld.cnf:
$ sudo vi /etc/mysql/percona-server.conf.d/mysqld.cnf
At the end of the file
[mysqld]
...
performance_schema = off
innodb_file_per_table   = 0
query-cache-size        = 256M
query-cache-limit       = 2097152
innodb-file-per-table   = 1
innodb-flush-method     = O_DIRECT
Then we want to secure the DB:
sudo mysql_secure_installation
Follow the instructions and enter a password for root.
Login to your database by typing mysql in the command line and execute the following queries:
To create a database for your Magento 2 website
Change database name 'magento' to the name of your database and magento_user to your user name and ‘YourPassword’ to a strong password with digits, special characters, uppercase and lowercase letters, and at least 12-16 characters.
# paste the password for the root user you set earlier
$ mysql -uroot -p
CREATE DATABASE magento;
GRANT ALL PRIVILEGES ON magento.* to 'magento_user'@'localhost' identified by 'YourPassword';
FLUSH PRIVILEGES;
exit;
Save and close. To take effect don’t forget to restart the MySQL service
$ sudo systemctl restart mysql
Next, we want to create the magento user, group, and folder and give the correct permissions:
$ sudo adduser magento --no-create-home --disabled-password
$ sudo usermod -a -G magento www-data
$ sudo chmod 750 /opt/magento2
step 2 - Install PHP 7.3 + php-fpm
In our Ubuntu available to install PHP 7.2. But we need to use the latest. Let’s add new PHP repo to our system
$ sudo add-apt-repository ppa:ondrej/php
$ sudo apt-get update
Magento 2 Open Source requires several PHP extensions to function properly:
sudo apt install -y php8.1-{bcmath,common,curl,fpm,gd,intl,mbstring,mysql,soap,xml,xsl,zip,cli}
sudo apt install php7.2-common php7.2-cli php7.2-fpm php7.2-opcache php7.2-gd php7.2-mysql php7.2-curl php7.2-intl php7.2-xsl php7.2-mbstring php7.2-zip php7.2-bcmath php7.2-soap
And configure php parameters to fit Magento requirements:
sudo sed -i "s/memory_limit = .*/memory_limit = 768M/" /etc/php/7.2/fpm/php.ini;
sudo sed -i "s/upload_max_filesize = .*/upload_max_filesize = 128M/" /etc/php/7.2/fpm/php.ini;
sudo sed -i "s/zlib.output_compression = .*/zlib.output_compression = on/" /etc/php/7.2/fpm/php.ini;
sudo sed -i "s/max_execution_time = .*/max_execution_time = 18000/" /etc/php/7.2/fpm/php.ini;
Let’s now create a magento php configuration file :
sudo nano /etc/php/7.2/fpm/pool.d/magento.conf
[magento]
user = magento
group = www-data
listen.owner = magento
listen.group = www-data
listen = /var/run/php/php7.2-fpm-magento.sock
pm = ondemand
pm.max_children = 50
pm.process_idle_timeout = 10s
pm.max_requests = 500
chdir = /
And restart PHP FPM to reload the config:
$ sudo systemctl restart php7.2-fpm
$ sudo systemctl status php7.2-fpm
You should see the status Active: active (running)
Step 3 – Install Composer Package Manager
Install composer to your system by the following commands or you can use official documentation.
$ php -r "copy('https://getcomposer.org/installer', 'composer-setup.php');" && php composer-setup.php
$ php -r "unlink('composer-setup.php');"
$ sudo mv composer.phar /usr/bin/composer
Step 4 – Install Nginx web server
Because Ubuntu contains old versions of Nginx, first of all, we need to add the latest packages. Let’s do that from the official Nginx documentation.
$ sudo apt install curl gnupg2 ca-certificates lsb-release
$ echo "deb http://nginx.org/packages/mainline/ubuntu `lsb_release -cs` nginx" \
 | sudo tee /etc/apt/sources.list.d/nginx.list
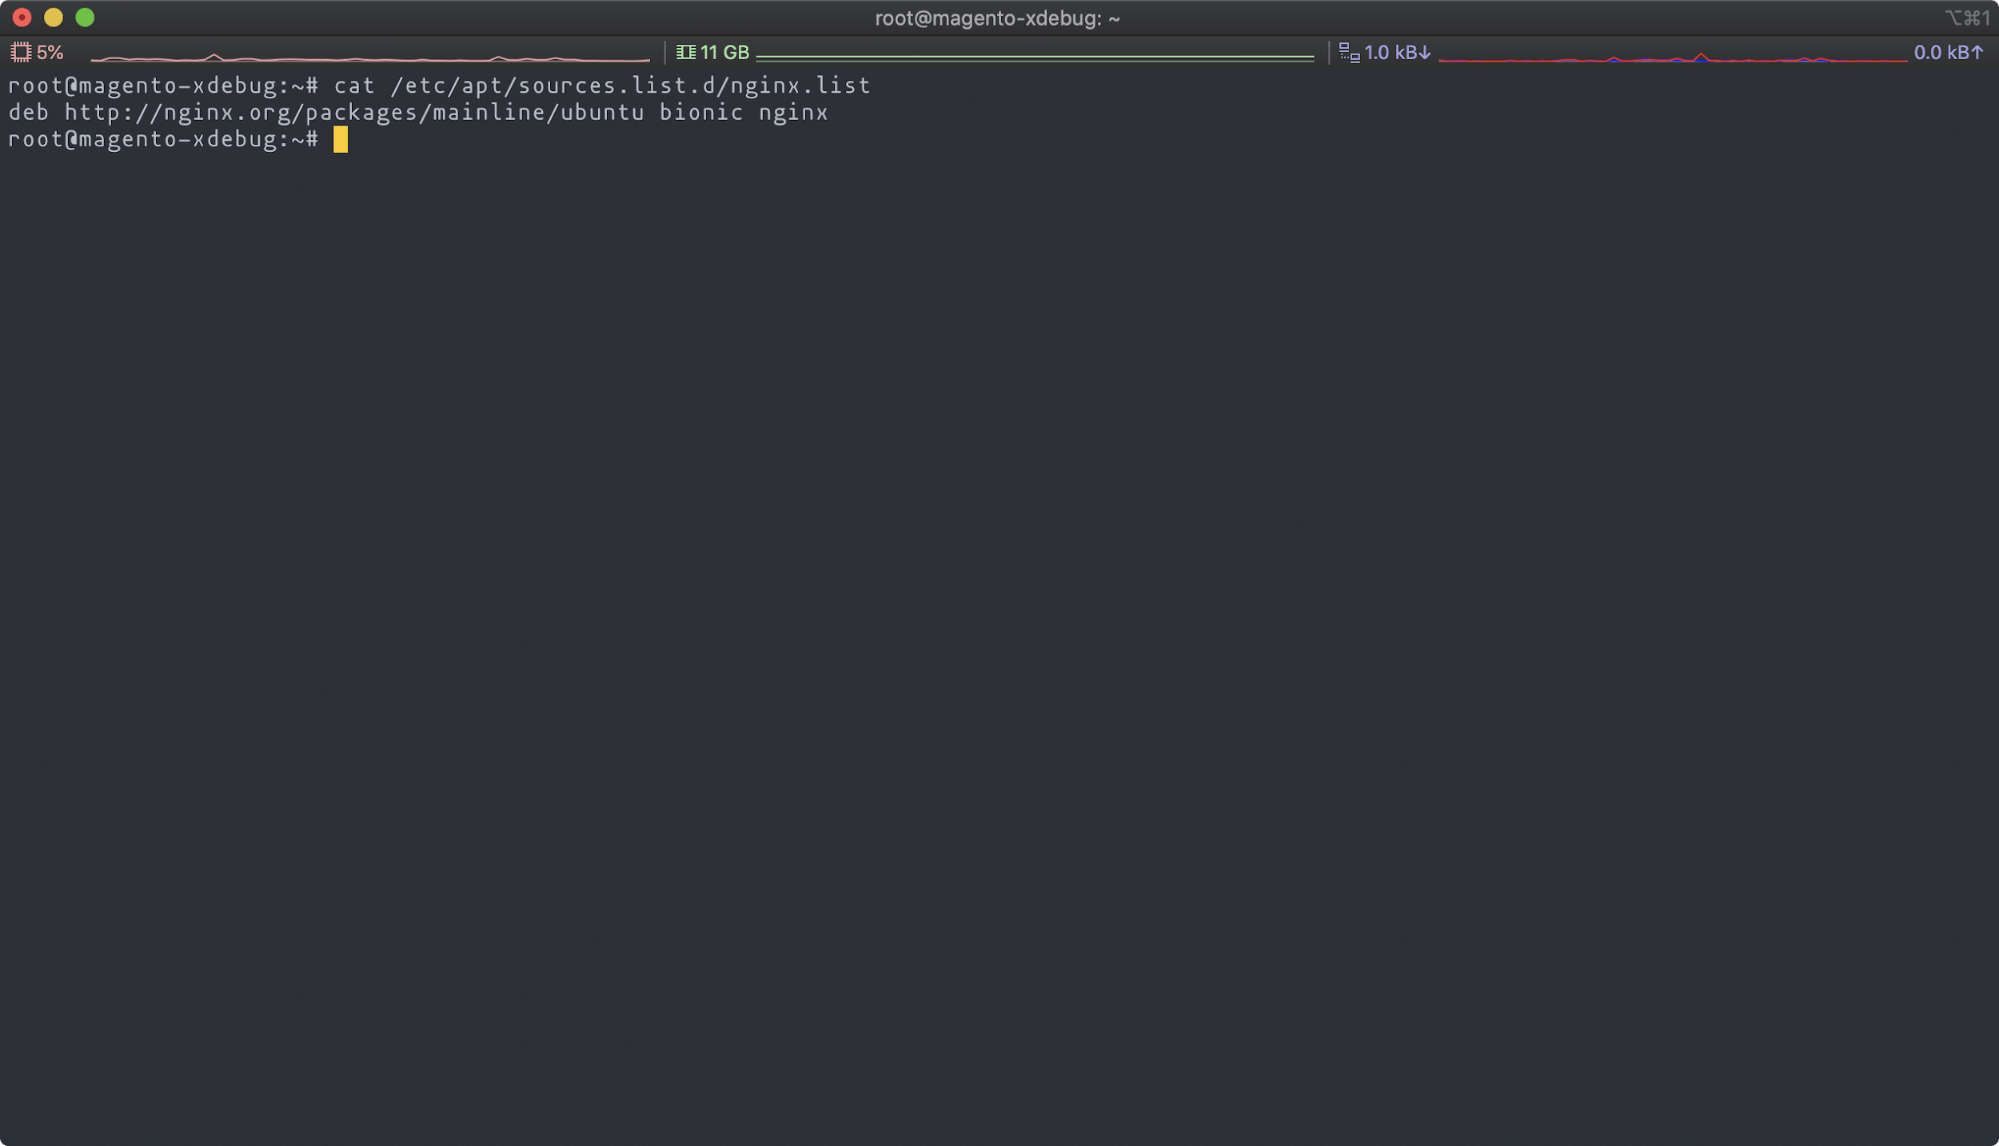
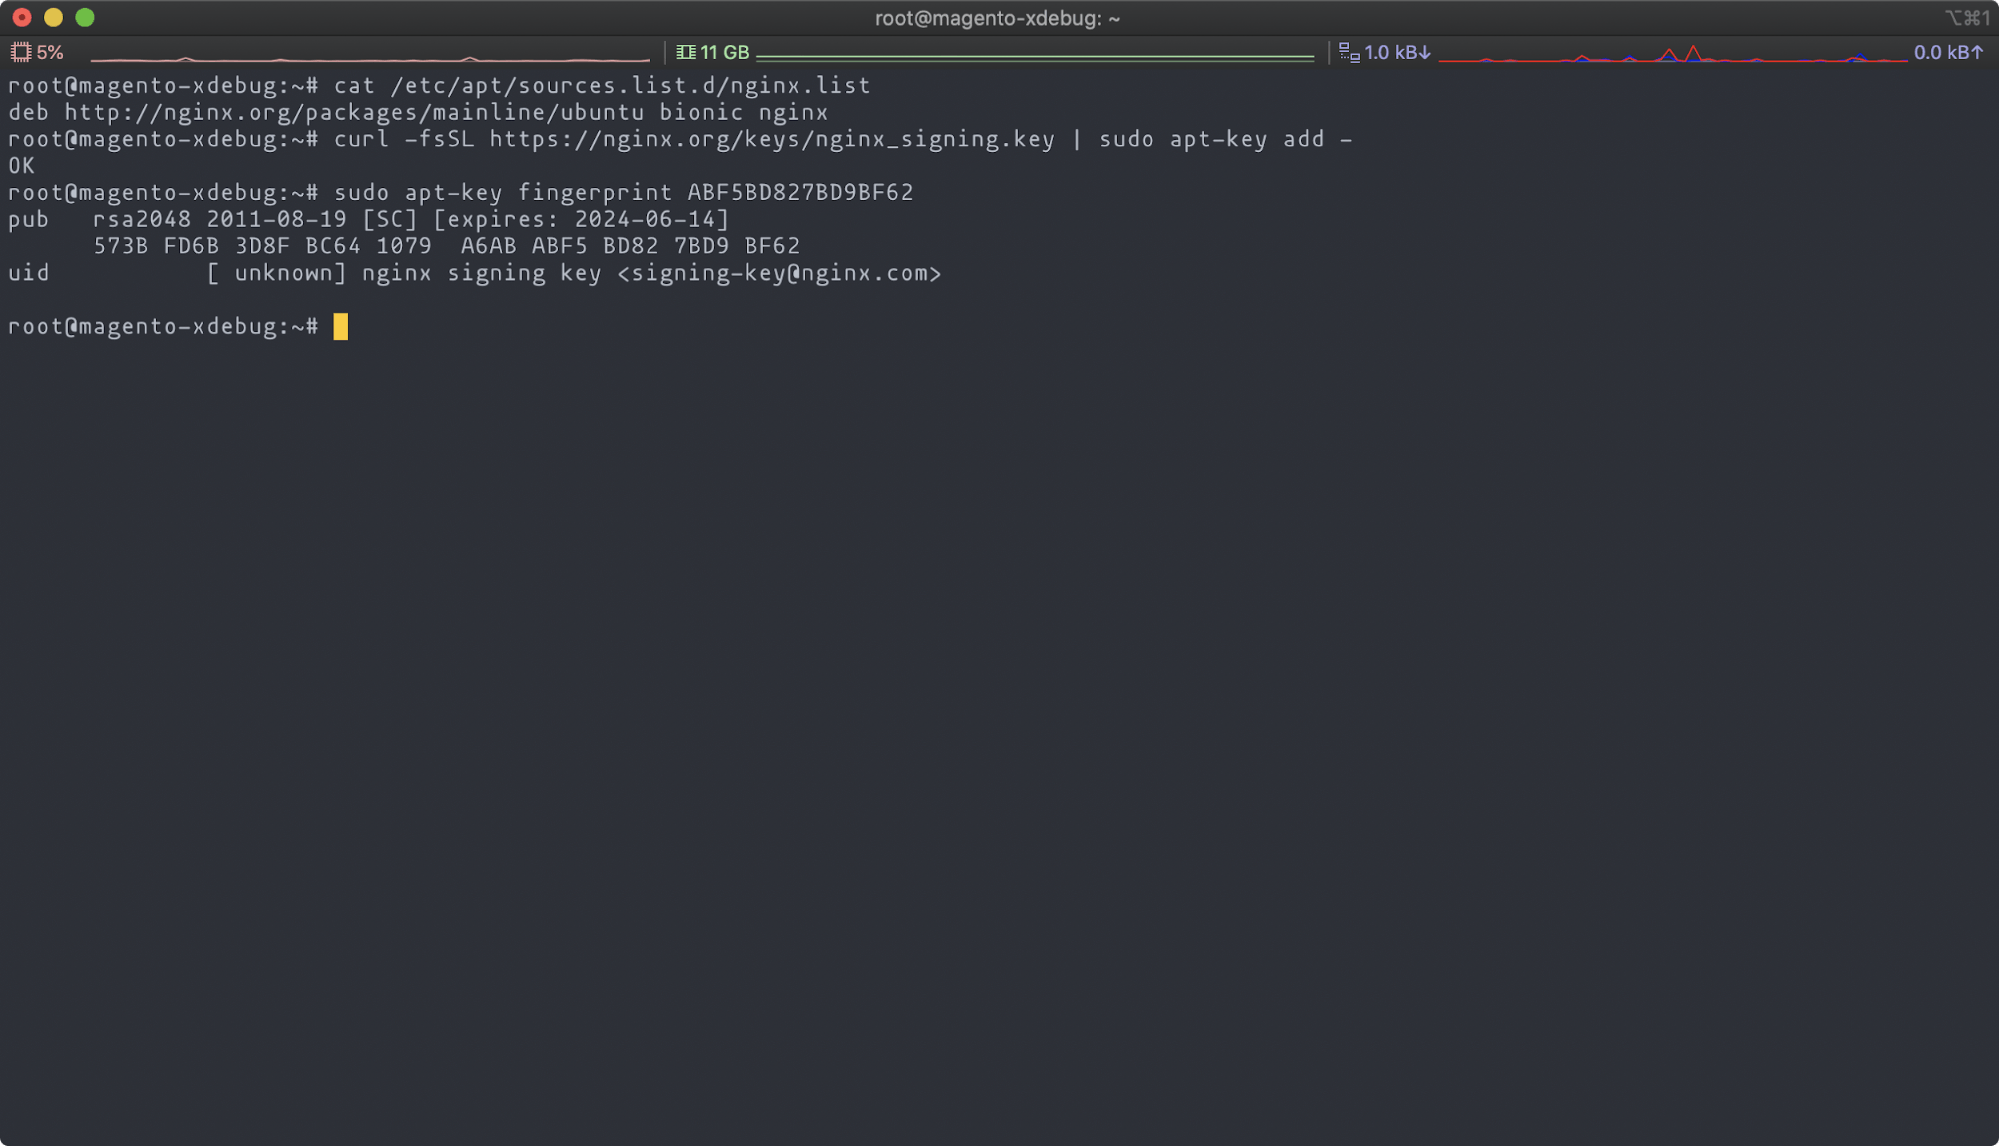
To be sure the Nginx mainline was added correctly, we can check with the following command:
cat /etc/apt/sources.list.d/nginx.list
We should see something like this
Next step, import an official Nginx signing key
$ curl -fsSL https://nginx.org/keys/nginx_signing.key | sudo apt-key add -
$ sudo apt-key fingerprint ABF5BD827BD9BF62
The output should be like in the screenshot below
install nginx with the following commands:
$ sudo apt update
$ sudo apt -y install nginx
Once the installation has been completed, let’s go to enable Nginx and check the status.
$ sudo systemctl start nginx
$ sudo systemctl status nginx
You should see the status Active: active (running)
Configure Nginx
Configure Nginx Magento Site(you can also create a new virtual host)
sudo nano /etc/nginx/sites-available/magento
Then copy and paste the content below into the file and save it. Replace the highlighted line with your own domain name and directory root location.
upstream fastcgi_backend {
    server unix:/run/php/php7.2-fpm.sock;
 }

 server {
    server_name <public IP of magento ec2 instance>; i.e 10.10.0.138;
    listen 80;
    set $MAGE_ROOT /opt/magento2;
    #set $MAGE_MODE developer; # or production

    access_log /var/log/nginx/magento2-access.log;
    error_log /var/log/nginx/magento2-error.log;

    include /opt/magento2/nginx.conf.sample;
  }
Save and close.
After configuring the VirtualHost above, enable it by running the commands below, then restart the Nginx server
Enable the Magento Site
sudo unlink /etc/nginx/sites-enabled/default
sudo ln -s /etc/nginx/sites-available/magento /etc/nginx/sites-enabled
sudo systemctl restart nginx
Install ElasticSearch
sudo apt install apt-transport-https ca-certificates gnupg2 -y &&
wget -qO - https://artifacts.elastic.co/GPG-KEY-elasticsearch | sudo apt-key add - &&
sudo sh -c 'echo "deb https://artifacts.elastic.co/packages/7.x/apt stable main" > /etc/apt/sources.list.d/elastic-7.x.list' &&
sudo apt update -y &&
sudo apt install elasticsearch -y &&
sudo systemctl --now enable elasticsearch &&
curl -X GET "localhost:9200"
install the composer
curl -sS https://getcomposer.org/installer | sudo php -- --install-dir=/usr/bin --filename=composer
Check whether Composer is installed or not:
composer -v
switch to the magento user to perform the installation.
sudo su magento
Step 5 - Install Magento via Composer Package Manager
composer create-project --repository=https://repo.magento.com/ magento/project-community-edition /opt/magento2
During this process, it will ask you to add credentials which you can find in your Magento Marketplace account. It will take some time to download the latest Magento modules and all dependencies.
Now, our server and Magento 2 are ready to be installed.
change into the directory where magento is installed in our case "/opt/magento2"
cd /opt/magento2
And here is the main command that will magically install Magento:
bin/magento setup:install \
--base-url=https://***.elb.amazonaws.com \
--db-host=localhost \
--db-name=magento \
--db-user=magento_user \
--db-password=magento \
--admin-firstname=admin \
--admin-lastname=admin \
--admin-email=myemail@gmail.com \
--admin-user=admin \
--admin-password=magento123 \
--language=en_US \
--currency=USD \
--timezone=America/Chicago \
--use-rewrites=1 \
--search-engine=elasticsearch7 \
--elasticsearch-host=localhost \
--elasticsearch-port=9200
All this does is install magento with admin details and database (configured earlier) details.
if you run into issues with the composer try disabling ipv6 with:
sysctl -w net.ipv6.conf.all.disable_ipv6=1
Check to see if your nginx settings are correct
$ nginx -t
It should display the following output
nginx: the configuration file /etc/nginx/nginx.conf syntax is ok
nginx: configuration file /etc/nginx/nginx.conf test is successful
Restart nginx
$ systemctl restart nginx
And change permissions to folders, disable two-factor authentication and setup cron jobs
sudo find var generated vendor pub/static pub/media app/etc -type f -exec chmod g+w {} + &&
sudo find var generated vendor pub/static pub/media app/etc -type d -exec chmod g+ws {} + &&
sudo chown -R :www-data . &&
sudo chmod u+x bin/magento &&
cd /opt/magento2/bin &&
sudo ./magento deploy:mode:set developer &&
cd /opt/magento2 &&
sudo -u www-data bin/magento module:disable Magento_TwoFactorAuth &&
sudo -u www-data bin/magento cache:flush &&
sudo -u www-data bin/magento cron:install &&
sudo -u www-data bin/magento info:adminuri
After completing the Magento installation, navigate to the base URL you specified during the setup process, and you'll witness your brand-new e-commerce store in action.
Setting up Caching with Varnish
Magento has the option of full-page caching with varnish.
From the Magento instance, Enable varnish by performing the following as a root user
cd /opt/magento2
sudo -u www-data php bin/magento config:set --scope=default --scope-code=0 system/full_page_cache/caching_application 2
sudo -u www-data php bin/magento config:set system/full_page_cache/varnish/access_list localhost,10.10.0.185
sudo -u www-data php bin/magento config:set system/full_page_cache/varnish/backend_host 10.10.0.185
sudo -u www-data php bin/magento config:set system/full_page_cache/varnish/backend_port 80
to configure Varnish to cache to serve up pages, you need to include the public IP and port of the instance Magento 2 is running to Varnish's access list and backend host.
After sshing into the instance you have selected for the installation of Varnish, you need to install and configure Web Server(we are going with nginx) on the Ubuntu OS server.
Step 1 - install varnish
sudo apt update
sudo apt-get install -y varnish
Varnish cache is installed to your server.
Check it out:
$ systemctl start varnish
$ systemctl status varnish
Step 2 - modify varnish system configuration
To modify Varnish System Configuration, open your Varnish Configuration File in a text editor:
sudo nano /etc/default/varnish
Then, modify the file to get a similar code below:
START=yes

# Maximum number of open files (for ulimit -n)
NFILES=131072

# Maximum locked memory size (for ulimit -l)
# Used for locking the shared memory log in memory. If you increase log size,
# you need to increase this number as well
MEMLOCK=82000

DAEMON_OPTS="-a :80 \
             -T localhost:6082 \
             -p http_resp_hdr_len=64000 \
             -f /etc/varnish/default.vcl \
             -S /etc/varnish/secret \
             -s malloc,256m"
Step 3: Modify default.vcl
First and foremost, you need to backup the old default one:
cp /etc/varnish/default.vcl /etc/varnish/default.vcl.backupThen, modify the lines under ‘backend default’:
 # Default backend definition. Set this to point to your content server i.e your magento server.
 backend default {
 .host = "127.0.0.1";
 .port = "80";
 }
You need to replace the value of .host with a qualified hostname or IP address as well as the listen port of the Varnish backend or origin server. It’s the server offering the content that Varnish will source. Commonly, it’s your web server your magento 2 app is running on
You need to replace the value of .port with the listen port (80) of your magento 2 app web server.
Step 4: Verify Magento 2 Varnish
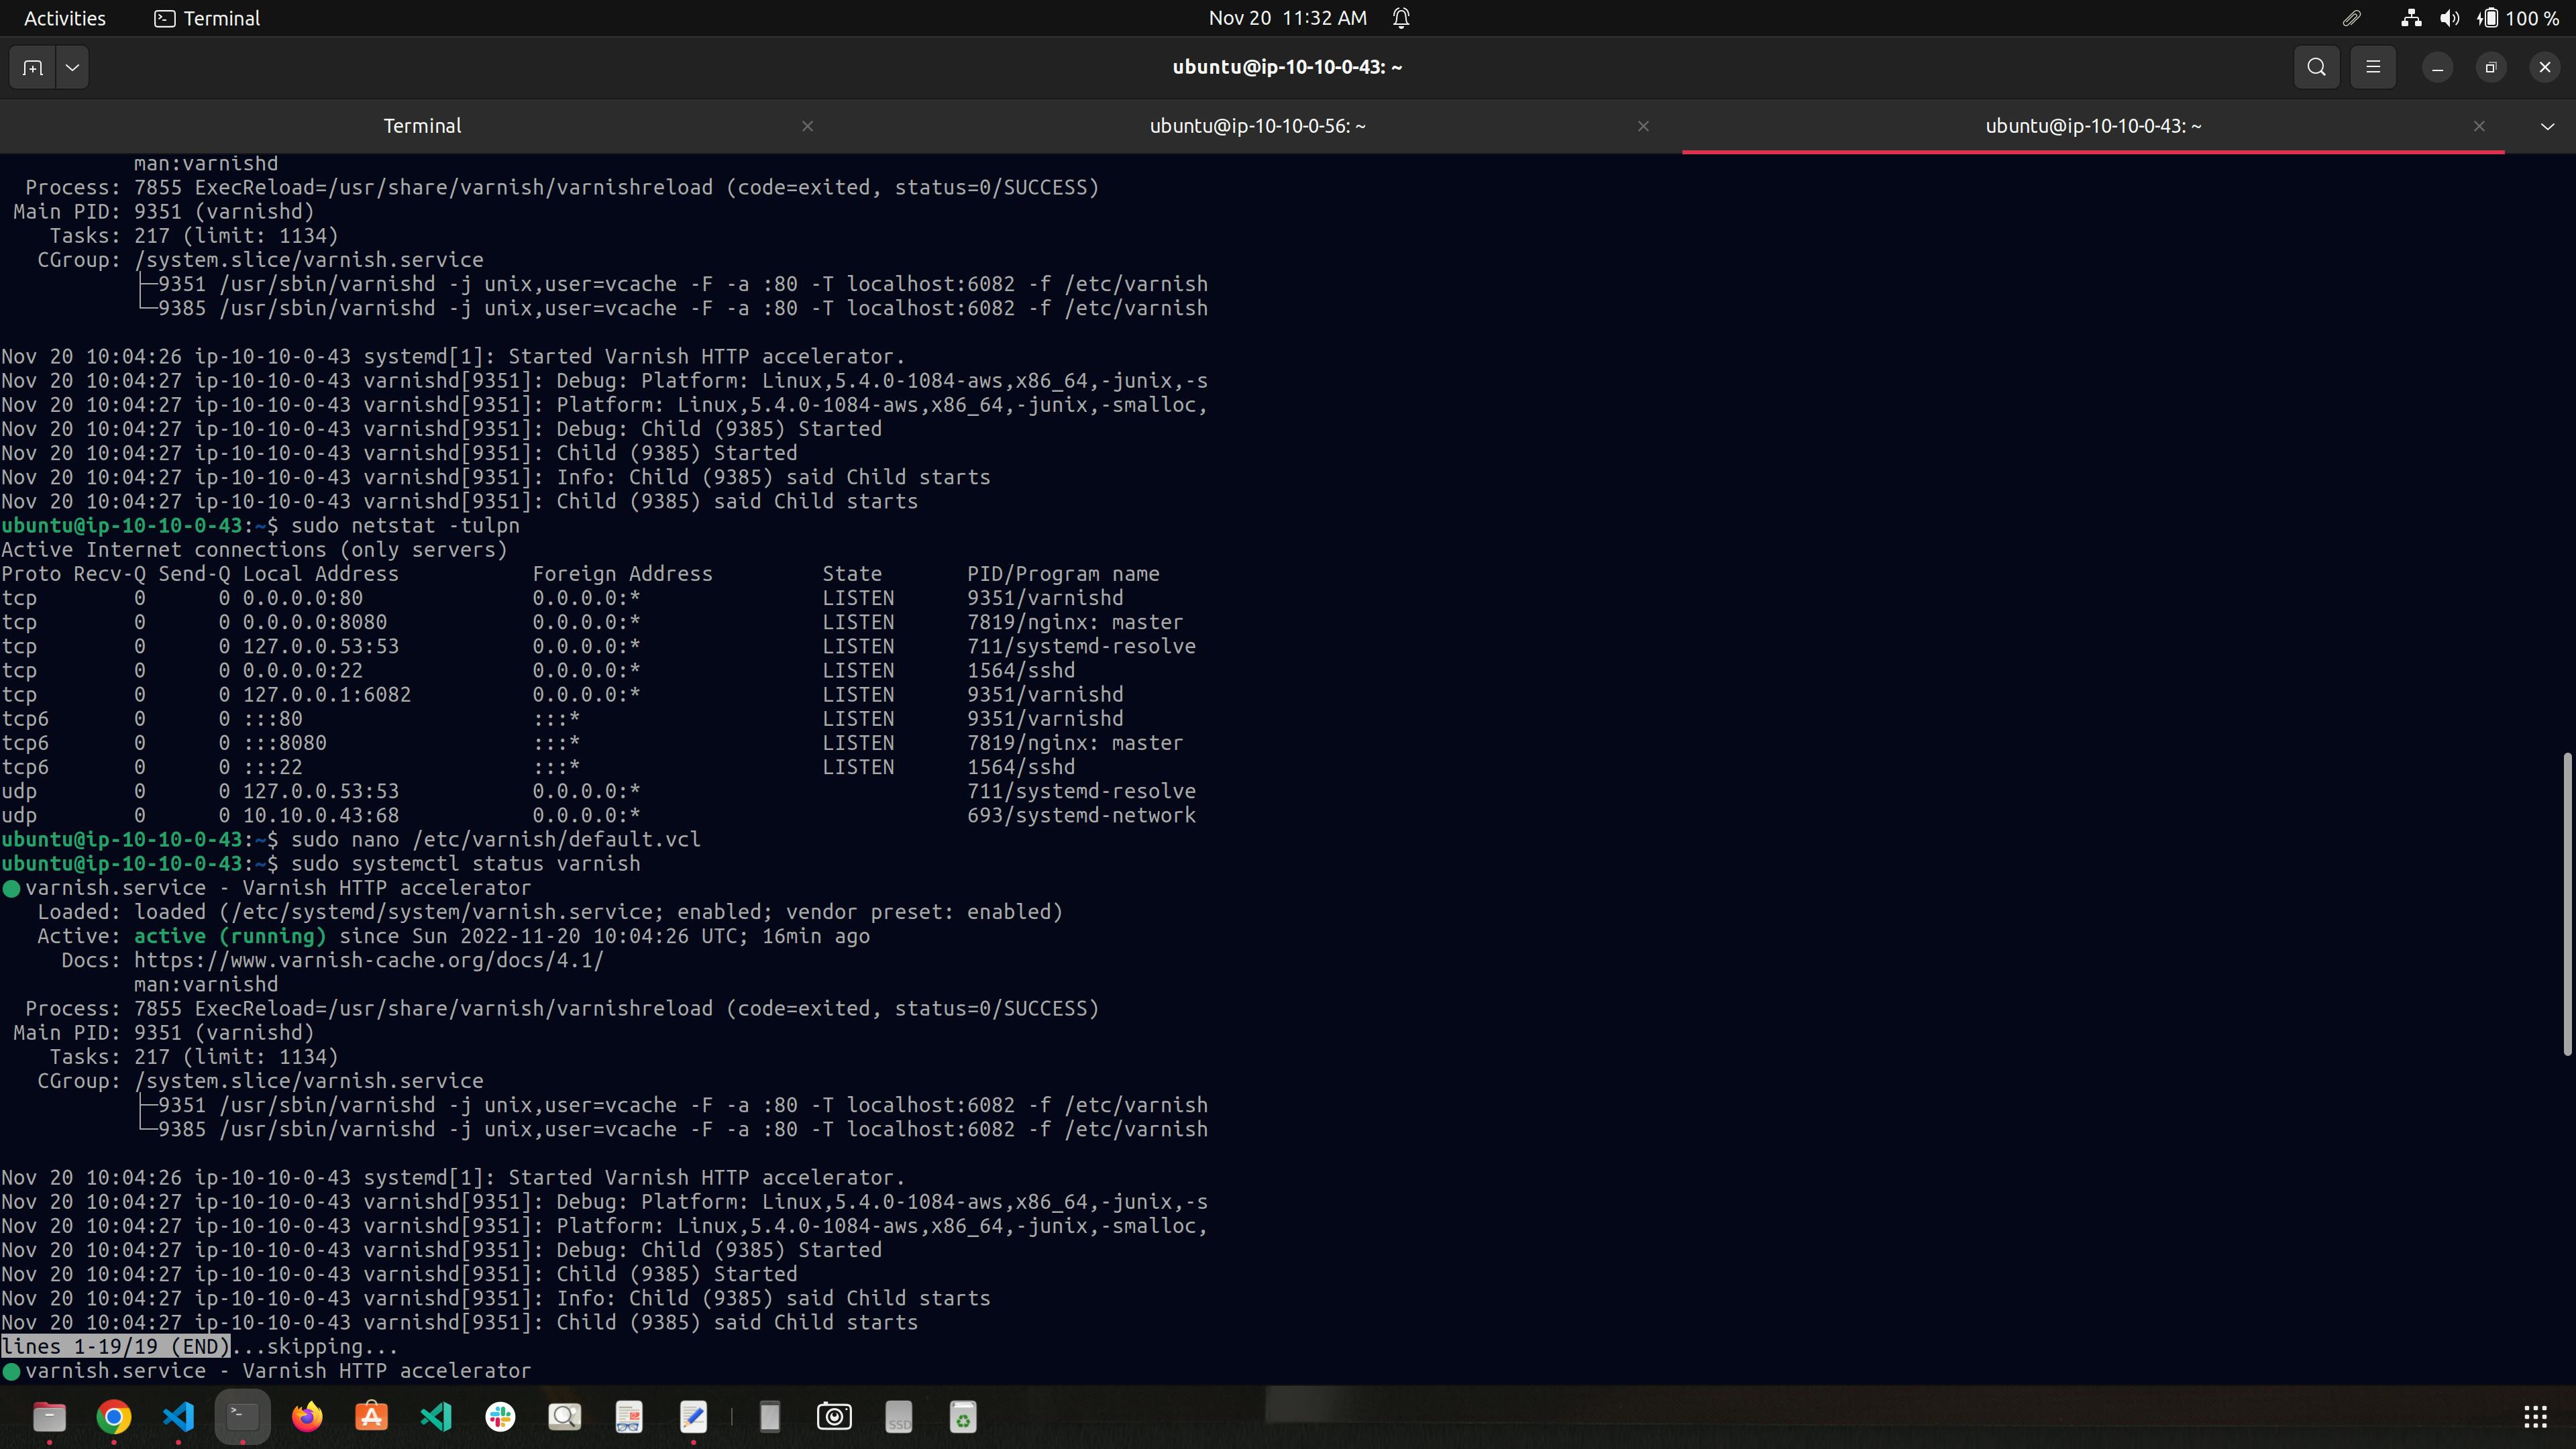
run the command below to check if Varnish is listening to port 80:
sudo netstat -tulpn grep varnishd
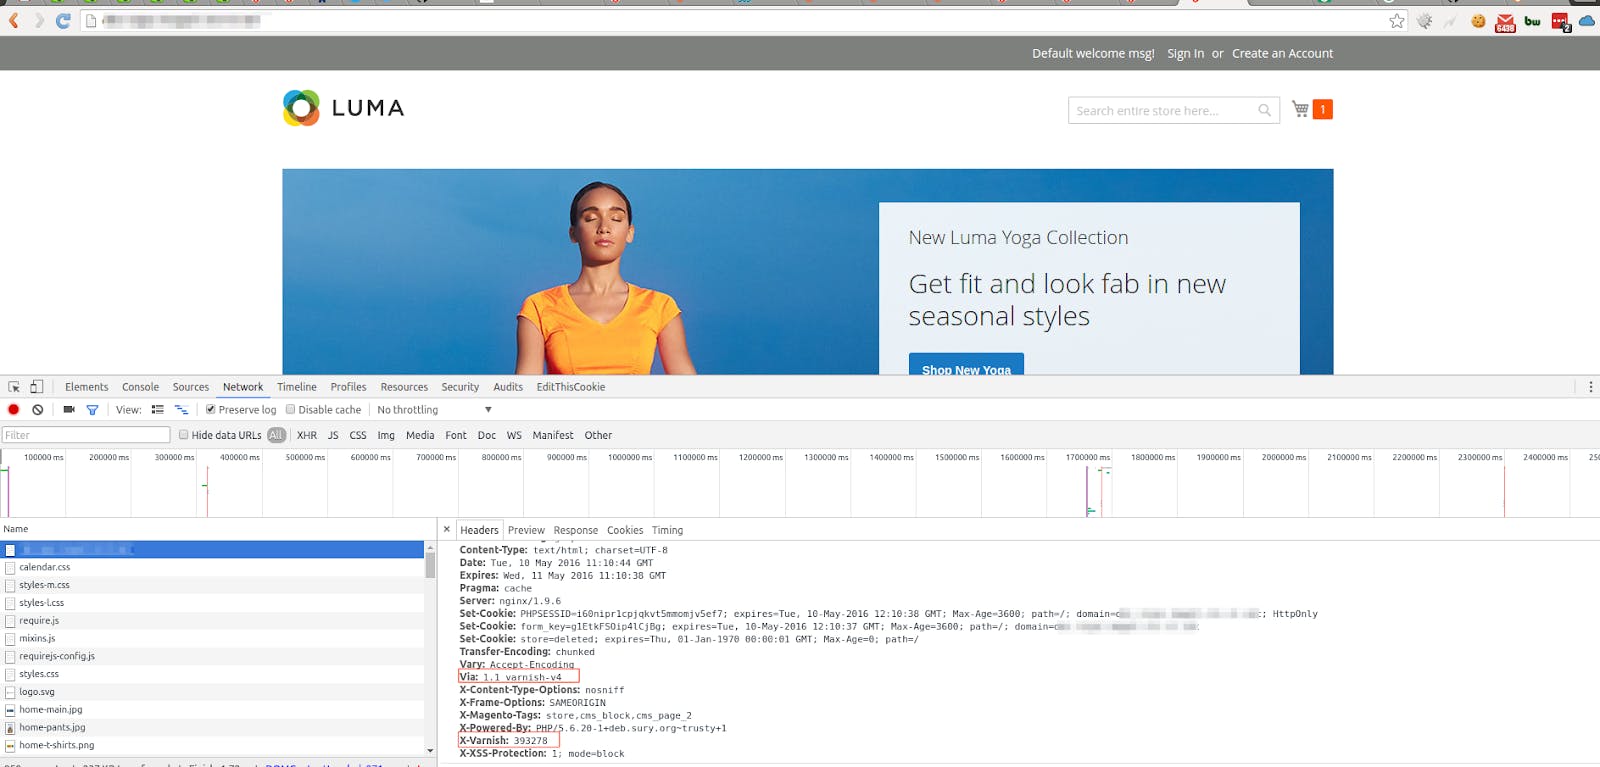
Verify the HTTP response headers:
To verify the HTTP response headers, you need to load your Magento 2 Frontend and check the response from the browser console. Afterward, you will see a similar screenshot below:
Congratulations! You have completed the configuration of Magento 2 with Varnish. It's time to let your online store soar to new heights!
Todo/Another Approach:
use elastic IP instead of instance public IP so we can point to domain name A record
use a NAT gateway and launch a Magento instance in Private Subnet(Nat gateways are pricey)
add AutoScaling rather than a single instance
serve Magento assets with Cloudfront distribution for automatic caching at the edge
add HTTPS support to the Nginx server serving the Magento app